Sep 30, 2015 • Updated Feb 8, 2016
RoboCat 270mm Build Project - FPV racer
I ordered my RoboCat 270mm quad online. This is a walk though of the unboxing, assembly, wiring, setup, and maiden flight. If you are going to order please support my channel buy ordering...
This article contains affiliate links. As an Amazon Associate I earn from qualifying purchases.
I ordered my RoboCat 270mm quad online. This is a walk though of the unboxing, assembly, wiring, setup, and maiden flight.
If you are going to order please support my channel buy ordering though my amazon affiliate links below. Thanks to everyone who has made orders though my affiliate page.
Also if you are looking for more content please consider supporting my projects on Patreon
(products listed are close equivalents to what came in my kit)
It came with:
The frame Hobbypower Tarot Robocat TL250H Carbon Glass Fiber Mixed Mini 250 FPV Quadcopter Frame Kit cc3d flight controller IEIK CC3D Openpilot Flight Controller Staight Pin STM32 32bit for Qav250 X-copter Multirotor Fixed Wing
 4- 12a simonk speed controllers Cheerwing® 4x Emax SimonK 12A Brushless ESC Speed Controller For FPV QAV250 200 Multi-rotor
 4 - emax mt1806-2280kv motors 2 Pairs EMAX MT1806 KV2280 Brushless Motor for RC 250 Racing Quad (2 CW + 2 CCW, totally 4PCS) w/ Free Gifts
 6 - 5 in props Andoer 2 Pairs 5030 5x3 Propeller 5*3 2-Blade Props CW/CCW Black for QAV250 C250 H250 Quadcopter Multi-rotor
 Power lead wires
Small power distribution board CC3D Flight Controller Mini Power Distribution Board PCB
Power lead wires
Small power distribution board CC3D Flight Controller Mini Power Distribution Board PCB Large power distribution board (didn't use in the build)
I already have:
Turnigy 30-40c 2200mah 3 cell Venom 20C 3S 2200mAh 11.1v LiPO Battery with XT60 plug for DJI Phantom 1 & FC40
Large power distribution board (didn't use in the build)
I already have:
Turnigy 30-40c 2200mah 3 cell Venom 20C 3S 2200mAh 11.1v LiPO Battery with XT60 plug for DJI Phantom 1 & FC40 Spectrum dx7 Radio
XT-60 connector
Purchased:
Video transmitter
Camera
Nylon Spacers/Screws
Still need to order:
OSD
Low battery alarm
onboard fpv recorder
I received the package fairly quickly everything seems in order.
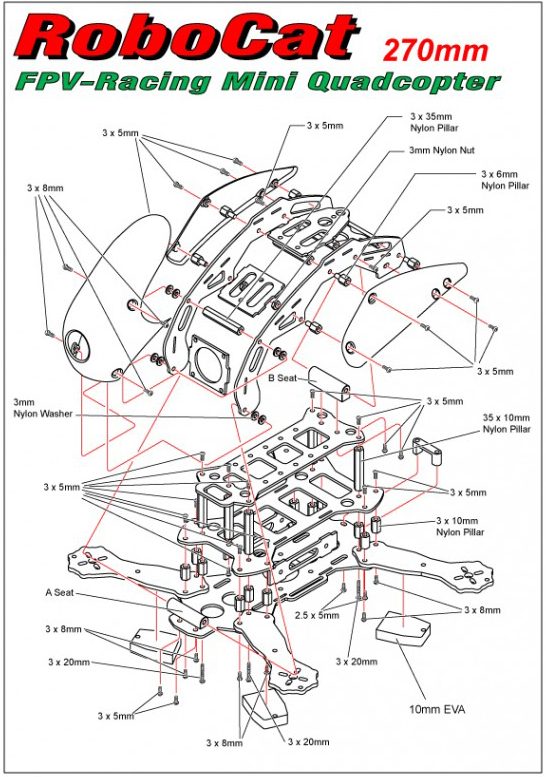
I got the frame together with little issues. there was a bad thread with one of the aluminum risers. But I made it work.
Diagram
Spectrum dx7 Radio
XT-60 connector
Purchased:
Video transmitter
Camera
Nylon Spacers/Screws
Still need to order:
OSD
Low battery alarm
onboard fpv recorder
I received the package fairly quickly everything seems in order.
I got the frame together with little issues. there was a bad thread with one of the aluminum risers. But I made it work.
Diagram
 Soldiered up the power distribution board and speed controllers, motors, and ran the configuration wizard in OpenPilot. now we are ready to mount everything.
Installed the electronics mounted the motors and cc3d flight controller. Just about ready to fly.
the maiden flight was a success! Very peppy.
By request here are some close up pictures of where I stuck everything.
Flying outside.
Please leave your questions or comments via the youtube videos.
here are my pid settings currently. I'm using position 1 and three.
I will be doing another video with some mods and eventually some fpv.
Thanks, Matt Davis
Soldiered up the power distribution board and speed controllers, motors, and ran the configuration wizard in OpenPilot. now we are ready to mount everything.
Installed the electronics mounted the motors and cc3d flight controller. Just about ready to fly.
the maiden flight was a success! Very peppy.
By request here are some close up pictures of where I stuck everything.
Flying outside.
Please leave your questions or comments via the youtube videos.
here are my pid settings currently. I'm using position 1 and three.
I will be doing another video with some mods and eventually some fpv.
Thanks, Matt Davis
cc3d flight controller IEIK CC3D Openpilot Flight Controller Staight Pin STM32 32bit for Qav250 X-copter Multirotor Fixed Wing
4- 12a simonk speed controllers Cheerwing® 4x Emax SimonK 12A Brushless ESC Speed Controller For FPV QAV250 200 Multi-rotor
4 - emax mt1806-2280kv motors 2 Pairs EMAX MT1806 KV2280 Brushless Motor for RC 250 Racing Quad (2 CW + 2 CCW, totally 4PCS) w/ Free Gifts
6 - 5 in props Andoer 2 Pairs 5030 5x3 Propeller 5*3 2-Blade Props CW/CCW Black for QAV250 C250 H250 Quadcopter Multi-rotor
Power lead wires
Small power distribution board CC3D Flight Controller Mini Power Distribution Board PCB
Large power distribution board (didn't use in the build)
I already have:
Turnigy 30-40c 2200mah 3 cell Venom 20C 3S 2200mAh 11.1v LiPO Battery with XT60 plug for DJI Phantom 1 & FC40
Spectrum dx7 Radio
XT-60 connector
Purchased:
Video transmitter
Camera
Nylon Spacers/Screws
Still need to order:
OSD
Low battery alarm
onboard fpv recorder
I received the package fairly quickly everything seems in order.
I got the frame together with little issues. there was a bad thread with one of the aluminum risers. But I made it work.
Diagram
Soldiered up the power distribution board and speed controllers, motors, and ran the configuration wizard in OpenPilot. now we are ready to mount everything.
Installed the electronics mounted the motors and cc3d flight controller. Just about ready to fly.
the maiden flight was a success! Very peppy.
By request here are some close up pictures of where I stuck everything.
Flying outside.
Please leave your questions or comments via the youtube videos.
here are my pid settings currently. I'm using position 1 and three.
I will be doing another video with some mods and eventually some fpv.
Thanks, Matt DavisUnlock the Home Business Operations Blueprint
Get our step-by-step PDF workbook and automation checklists to reclaim 10+ hours weekly, streamline billing, and automate client onboarding.
Categories:
RC